Invisible mask: practical attacks on face recognition with infrared Zhou et al., arXiv’18
You might have seen selected write-ups from The Morning Paper appearing in ACM Queue. The editorial board there are also kind enough to send me paper recommendations when they come across something that sparks their interest. So this week things are going to get a little bit circular as we’ll be looking at three papers originally highlighted to me by the ACM Queue board!
‘Invisible Mask’ looks at the very topical subject of face authentication systems. We’ve looked at adversarial attacks on machine learning systems before, including those that can be deployed in the wild, such as decorating stop signs. Most adversarial attacks against image recognition systems require you to have pixel-level control over the input image though. Invisible Mask is different, it’s a practical attack in that the techniques described in this paper could be used to subvert face authentication systems deployed in the wild, without there being any obvious visual difference (e.g. specially printed glass frames) in the face of the attacker to a casual observer. That’s the invisible part: to the face recognition system it’s as if you are wearing a mask, but to the human eye there is nothing to see.
As a result, the adversary masquerading as someone else will be able to walk on the street, without any noticeable anomaly to other individuals but appearing to be a completely different person to the FR (facial recognition) system behind surveillance cameras.
There are two levels of invisible mask attacks: subverting surveillance systems such that your face will not be recognised, and deliberately impersonating another individual to pass authentication tests. The authors achieved a 100% success rate at avoiding recognition, and a 70% success rate in impersonating a target individual!
A quick primer on facial recognition
The typical steps in identifying individuals from surveillance videos are as follows:
- The video is split into frames, and analysed image-by-image
- Each image is pre-processed to extract faces: a land marking model identifies a set of land mark points for each face, which is used to crop out the face from the image.
- Each face is input to a face embedding model that converts it into a fixed length vector for future searching.
Face embedding enables face authentication, face searching and face clustering, through thresholding the distance between photos, calculating a given photo’s nearest neighbors and clustering a set of photos, based upon their vectors. The most famous face embedding system is FaceNet, built by Schroff et al. at Google in 2015, which achieved a 99.63% accuracy on the LFW face data set.
For a given application, it’s unlikely that developers will develop their own face embedding model from scratch. Instead it is common to embed well-known models with pre-trained weights.
The effect of infrared light on detection cameras
Infrared light (IR) is picked up by camera sensors, but cannot be directly observed by humans. The RGB sensors in a camera will respond (to a lesser degree) when illuminated by infrared. Note the meaningful response levels at 850nm (IR) for the RGB sensors in the figure below.
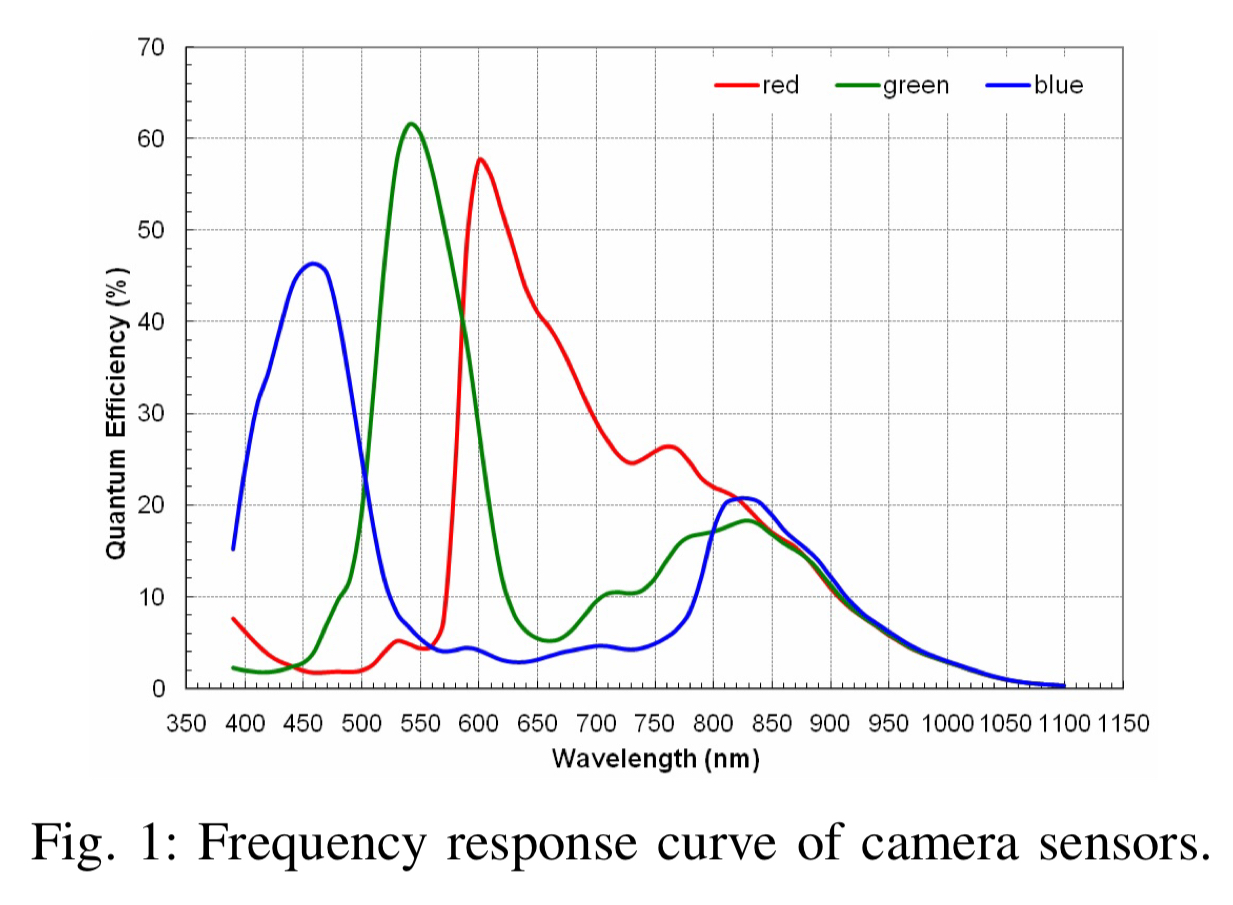
What this means is that the blue sensor can mistake infrared for blue light, the red sensor for red light, and the green sensor for green light.
As a result, camera sensors can generate an image very different from what people see, when the object in the image is exposed to infrared.
I’m gonna buy a hat…
So the key idea here is to shine infrared light onto your face, in such a way that facial recognition systems are fooled. A small number of LEDs hidden in e.g. a cap turn out to be plenty good enough for this.
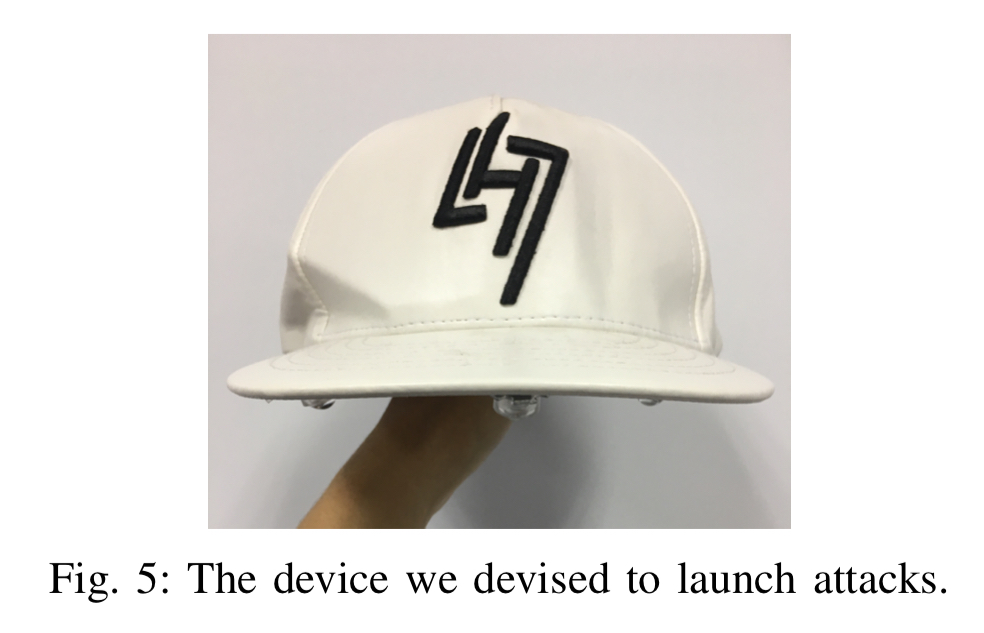
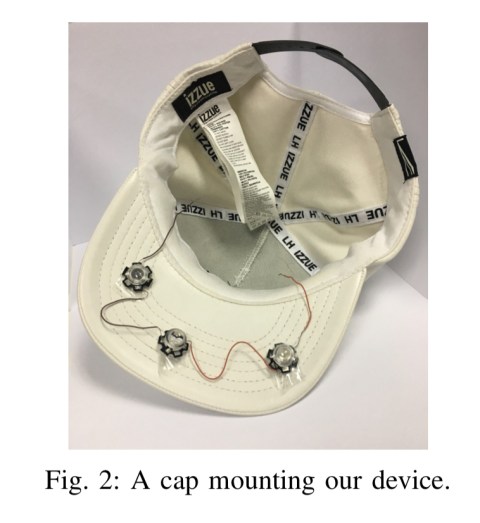
If all you want to do is avoid being recognised the infrared shining onto your face is sufficient to cause the face landmarking model to fail to output a set of valid land mark points. Three LEDs are sufficient for this (and can run for 2 hours off of a single small battery), more may be needed in a bright outdoor scenario.
In the spotlight
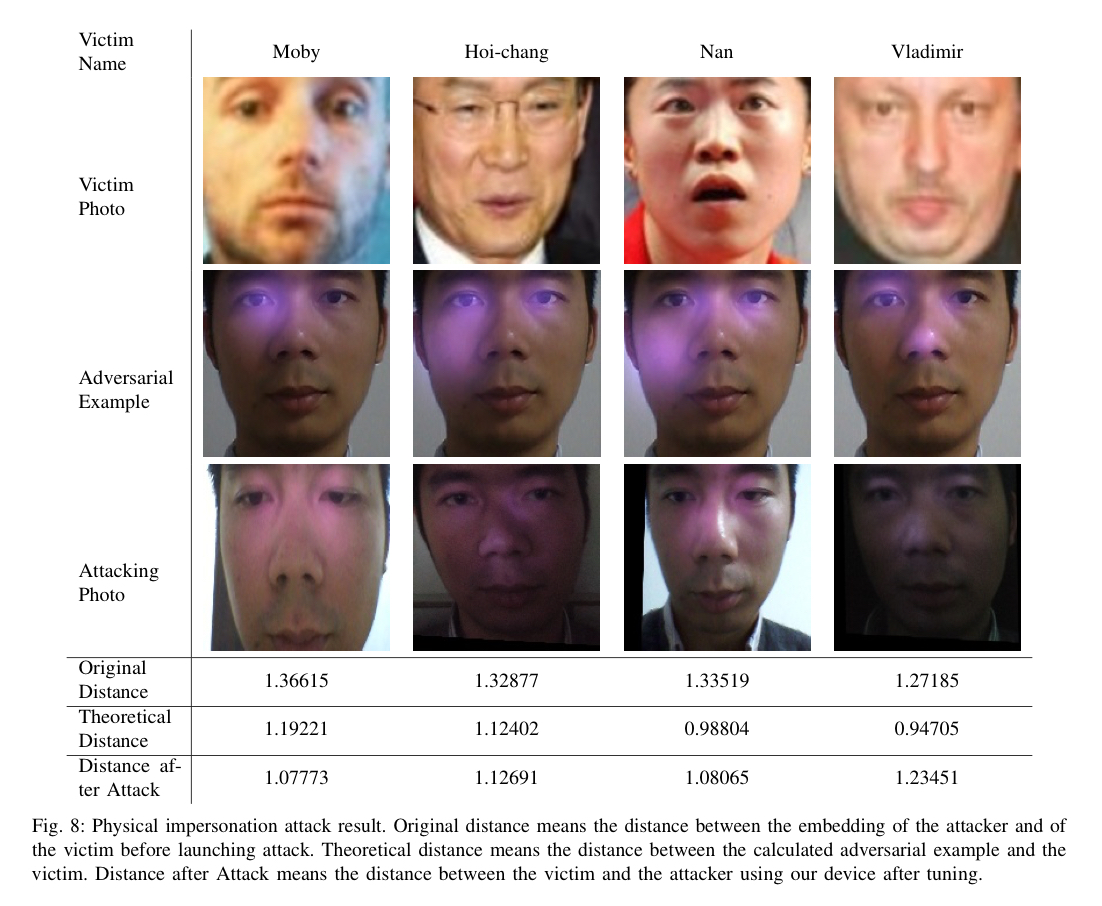
To pass off as someone else though, we need to find a carefully calibrated setup of infrared light. This is done in three stages. First a model approximates the setup that is going to be needed by optimising the loss between the embedding vector of the target face and the embedding vector of the attacker’s face, through the addition of light spots. Then the attacker transfers these settings to the attack device (e.g., cap), and sits in front of an interactive calibration tool. The tool provides feedback on the loss as the attacker adjusts the positions, brightness, and sizes of the LEDs in line with its suggestions.
Since the light spot model (and hence the loss) is only an approximation, a final step of further fine-tuning, adjusting the LEDs in the direction that has been decreasing loss but without caring about the absolute loss value anymore, can further enhance results.
The infrared light spot model works as follows:
- Light spots are represented as circles, with brightness attenuating from the centre.
- The size of the spot is modelled as the standard deviation of a normal distribution, this parameter is adjusted by the optimiser.
- The center coordinates of a light spot are also controlled by the optimiser.
- The ratio of the brightness is fixed at 0.0852 : 0.0533 : 0.1521 for R: G: B, representing the differing sensitivities of the sensors to IR light.
- The absolute brightness of each spot on the same face is different, and this is calculated by assigning an amplification coefficient to each spot which determines its centre brightness.
To get a face image with effects of all LEDs, we accumulate the effects of different LEDs together and apply the result to the original image… We choose an Adam optimizer to find adversarial examples.
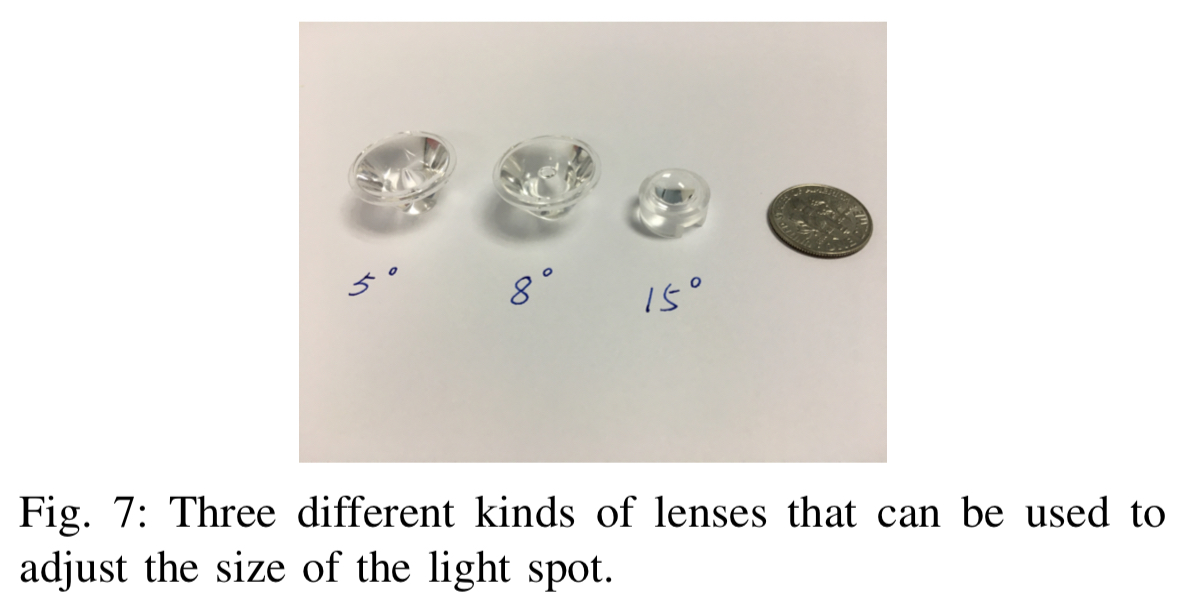
When transferring the model outputs to the attack device the attacker finds the correct mounting points for the LEDs. The size of the spot is then adjusted by selecting the appropriate lens type (see figure below), and the brightness is controlled by a PWM circuit turning the LED on and off at a very high frequency to reduce the perceived brightness.
Who do you want to be today?
The evaluation uses the LFW face data set, and assumes FaceNet embedding model on the backend. The authors only did limited testing to avoid any medical issues potentially associated with exposure to the IR light. In video tests for evading recognition, an attacker wore the hat and was videoed rotating his head as much as possible. Across every single frame of the resulting video, the face recognition software failed to recognise a face appearing!
For the impersonation attack, 3 LEDs were found to be sufficient. Tuning the LEDs to achieve the desired false identification took around 5 minutes each time.
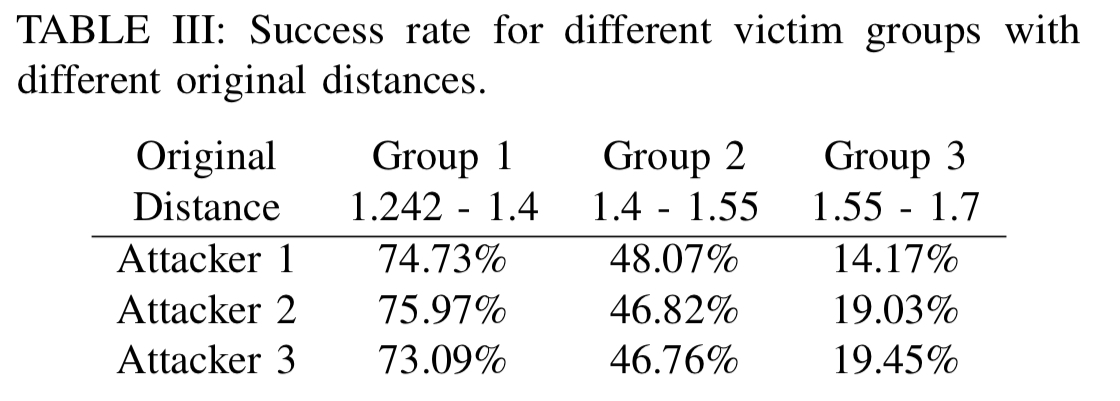
The starting distance between the attacker’s face and the face of the chosen target does impact the likelihood of success. A study was undertaken with three different attacker faces, looking across the whole LFW dataset. Depending on the original distance, the chance of success for a given pairing ranges from 70+% to only 14%. Within a group of attackers though, it’s likely that there will be one attacker who is close enough to the chosen victim.
Based on our findings and attacks, we conclude that face recognition techniques today are still far from secure and reliable when being applied to critical scenarios like authentication and surveillance.
4 thoughts on “Invisible mask: practical attacks on face recognition with infrared”
Comments are closed.